Monday, November 17, 2008

Art Opening at Buffalo Arts Studio- Buffalo, NY 11-15-08

I just thought I'd put up some pictures from the annual art opening that the Buffalo Arts Studio has just before Christmas. It's a great event to go to, see friends, have a drink and lots of nice appetizers and even some live music. David Kane played the keyboard and there was an improve dancer. My painter friend Sue, me and Carl, a writer and musician.


Some crowd shots.


Me and Roberto, a buddy of mine from Buffalo State College sculpture class.

Wood sculpture by Roberto Pacheco, a woman dancer.
Ken Morgan photographer and David Kane the musician.
Bill Cooper, painter, and for this show he decided to make some paper sculptures.

Friday, November 14, 2008

"Green Hooded Woman" tiny watercolor 11-14-08

Well, late last night, I just had to play with my new little watercolor field kit I put together. I love making up new kit ideas to carry my art stuff around in.

A picture of it all packed up, it only stands 6" tall and 4" wide.

Here it is with all the contents laid out, can you believe how much stuff I can fit inside it?

For the painting, I actually painted it while laying on the bedroom floor! Sometimes I think I'm just a kid in grown up clothes, doing things I would have done when I was younger. In College I painted using an old bread board on the floor, all the time! I had no desk in my apartment and it was just easier.

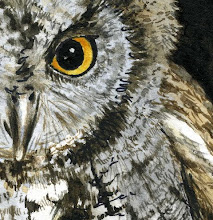
Well, back to my tiny watercolor. It's only 3 1/2" x 4 1/2" big! I used little brushes and the tiny little cup for water. I didn't start with any drawing, I just started painting, looking for the shapes and laid them in lightly. As I started to add the face details, that's when I checked using comparative measurements, where her mouth, nose, eyes all fell. Then I pulled the hood down a tad before putting it's green color on.

Below, I added the background wash and more on the hood, washing some background blue onto the green of the hood. I lightened the eyes also, touching them up. And then darkened the shadows.

Last is the finished little painting. I worked on hair details more, adding some burnt sienna to add warm darker tones and more hair strands. I painted some purple in the shadow on her chest near my signature. The purple was a nice choice, darkened without making it look dirty colored. I added more greens and a light wash of cadmium yellow to the upper hood to warm it up. The hood on the left side (shadow side) got only blue washes. I added some darks on her upper chest and washed over her shoulder, then lifted the highlight by dabbing a clean paper towel after wetting the paper repeatedly. Then after deciding the eyes were as good as I wanted them, (sometimes a hard thing to let go of) I added a tiny white highlight with a dot of white watercolor paint. Finished little beauty!! Hope you like it!

"Harris Hawk" oil (work in progress) 11-2008

I thought I'd put up some pictures of the Harris Hawk oil painting I'm trying to find time to work on. I started this a year or so ago! The underpainting shown below, has been sitting around in my studio so patiently waiting for more! It's done with wet burnt umber then I wiped off to 'draw' the bird on the canvas. A very nice, freeing technique, you just concentrate on the shapes like you should.

Then below, I start what's called the dead color stage, flat blocked in areas of color as close to the final color as possible.


Below you can see me, wow do I look serious or what? I decided to hold the palette this time, sometimes I put it on my custom biult (by me) painting tower. But I like having the colors right there in my hand so to speak, for mixing and direct painting onto canvas. This is it so far...shapes are looking good, colors too. I have to decide what I'll do with the sky or background.

Tuesday, February 12, 2008

"Sunrise Oil Pastel" 2-11-08

Late last night I decided to play with my oil pastels while watching 20,000 Leagues Under the Sea. Well between scenes of Captain Nemo and Kirk Douglas I did a painting 9x12" on canvas paper. I worked from a photo I took just the other morning when I did the Sunrise, Coffee and PJ's post. So you'll see a similarity between the sunrise paintings, but in this one the sun is UP now, more contrast in the clouds and color in the sky.

The canvas paper is something I've never used oil pastels on, but it's supposed to be good because it's coated with gesso to protect the paper from the oils in the pastels. I liked how easy it was to smear or blend BUT...I did not like how soon everything got too slippery to add more color.
I will try the Fredrix brand of canvas paper next to see how that behaves, it's real canvas in a tablet form. The one I used for my 'sunrise' painting is Daler-Rowney oil painting paper. Besides trying out the Fredrix brand I'll also try gessoing some illustration board and see how that works. I have a feeling I'll like it without the weave and still be able to play around with linseed oil or turpintine if I want. This isn't something I have ever used with my oil pastel paintings, but I would like to try it more and you can't use these mediums if you are working on regular paper.
I hope you liked my Sunrise!

Monday, January 28, 2008

Inktense Color Pencil test 1-27-08

I just bought a complete set of "Inktense Color Pencils" from Derwendt. I did some tests with them to get familiar with what they do when dry or wet. The inktense pencils are water-soluble but when they dry are permanent. I found the colors to be vibrant + fantastic!

First I lay down a very pale wash about an inch long and 1/4 inch wide. (the wash I did was a 'dry wash', this is a term that means a light layer or drawing with a light touch to add a light layer.) Then I added, with a progressively heavier touch, more to the strip going left. You can see it's darker on the top left of each color swatch and lighter on the right. Then I used a 'waterbrush', that is a brush that holds it's own supply of water for field work, to pull down color from the top. As I got to the darkest area, on every single color I was amazed at just how brilliant and beautiful each color was! Even the browns, neutrals and mustard color were lovely!

I'm really not used to using water soluble color pencils but I will make an effort to use these till I get the hang of it. My intent is to use them in the field when hiking, to lay down washes that may be worked over with ink or color pencil. I did a catapillar drawing and colored it with them just today, check it out on my Nature Sketching Blog at : http://marymcandrew.blogspot.com/
Let me know if you have used the inktense pencils and what you thought of them.

Thursday, January 24, 2008

Coffee Experiment on Watercolor Paper 1-20-08

The other day I did some experimenting with watercolor paper and instant coffee. I had seen this used for a background for classical drawings. Now that I've tried it I can see that a bit of practice and light-handed use of coffee is a good idea. The first ones I did with just wet paper, brushed on with a big 'mop' watercolor brush, then I sprinkled INSTANT coffee crystals all over it. (No it doesn't matter if it's decaf or regular! ) I then brushed it until it colored the paper, then I re-sprinkled it with a bit of coffee. I guess I could mix some coffee up with water first to use as a tint. The one where I used bristol board I brushed with a house painters brush, it gave it interesting streaks.


The second set of papers I used two different brown watercolor paints to tint the paper. I used one big 11"x14" sheet that I taped to a board 1st. I wet it with water and the mop brush then brushed the color on. As it took on a sheen I sprinkled the coffee on and watched what it did...#1 is just coffee sprinkled and not touched, a little too heavy and spotty looking to me. #2 is same as #1 but then I brushed the coffee after awhile and re-sprinkled a tiny amount. #3 is same as #2 but I added salt and just left it alone. (note here...I just love using salt!! I love the random patterns it creates!) The sample pictures I posted here are cropped parts of the actual sheet I made. If I get a sheet I like I'll scan it, save it and perhaps I can print it out to use for drawings without worrying about messing up a hand-painted sheet. Let me know if you ever use this technique and how it worked for you. I'll be drawing with brown ink, brown pencils or pastels with some white chalk highlights on this paper. If I get time, I'll post what I do with it!

Sunday, January 20, 2008

"Iris Watercolor Painting with Travel Palette"

I decided to put that little travel watercolor palette to test. I picked up a gorgeous iris and lily yesterday, sketched it out and started the first stages of painting. My objective here was really to test out the palette, watercup arrangement and holding the light board all in one hand. I want to see if I can use it like this in the field without an easel for little studies. You can click on any picture to see enlarged views.

I show a close up of the arrangement so you can see the watercups; they are actually for holding mediums for oil painting, designed to hold the liquid even when tipped slightly on a hand held palette. They worked fantastic! I had to get over the habit of looking for my watercup on the table! You can see the 'sticky tack' or 'blue tack' in my palette. Yesterdays blog explained that better, so they get tested today and it worked wonderfully! Yay..two experiments that worked.
My hand got a bit tired from holding the board and palette but this set up is supposed to be for quick studies, I worked on it longer than I would in the field.
The pictures are to show the stages of my painting, start to finish.


"Quick Watercolor of an Iris"


This is a watercolor I did of an iris that I approached spontaneously. No sketch, just direct painting with the brush, I did it rather quickly in a regular sketchbook (thin paper). I'll have to get my chinese brushes out and 'brush up' with them, I used to paint everything with them!

Tuesday, January 8, 2008

Sketch of Connor 11-1-07

I did these very quick sketches of my son Connor while we were waiting at the dentist's office. At first he really didn't want me to draw him, not unusual, but he was a good sport about it! Thanks Connor!

I did it with a ball point pen in a tiny sketchbook (3"x5" ?) I keep in the car all the time. With pen you have to make small placement marks first and light lines, sometimes you have to cover over marks you don't want with heavier lines.
Hope you like them!